概要
なお, OS は Ubuntu 18.04 である.
準備
apt でインストールできるようになっていた*3. 以下で紹介されているようにリポジトリ登録してドライバと CUDA をインストールする. バージョンはそれぞれ 430.50, 10.0 で, mxnet も keras も動かすことができた. 今回は画像認識も試したかったので cuDNN 7 もインストールする.以下は, tensorflow の公式で紹介されてる手順を一部変更したものである. 最後の libnvinfer は必須ではないと思うが, ついでに入れておいた.
sudo apt remove --purge cuda*
sudo apt remove --purge nvidia*
sudo apt clean
wget https://developer.download.nvidia.com/compute/cuda/repos/ubuntu1804/x86_64/cuda-repo-ubuntu1804_10.0.130-1_amd64.deb
sudo dpkg -i cuda-repo-ubuntu1804_10.0.130-1_amd64.deb
sudo apt-key adv --fetch-keys https://developer.download.nvidia.com/compute/cuda/repos/ubuntu1804/x86_64/7fa2af80.pub
sudo apt update
wget http://developer.download.nvidia.com/compute/machine-learning/repos/ubuntu1804/x86_64/nvidia-machine-learning-repo-ubuntu1804_1.0.0-1_amd64.deb
sudo apt install ./nvidia-machine-learning-repo-ubuntu1804_1.0.0-1_amd64.deb
sudo apt update
sudo apt install --no-install-recommends nvidia-driver-430
# この時点で一旦再起動する (重要)

# Install development and runtime libraries (~4GB)
sudo apt install --no-install-recommends  cuda-10-0  libcudnn7=7.6.2.24-1+cuda10.0 libcudnn7-dev=7.6.2.24-1+cuda10.0
# Install TensorRT. Requires that libcudnn7 is installed above.
sudo apt install -y --no-install-recommends libnvinfer5=5.1.5-1+cuda10.0 libnvinfer-dev=5.1.5-1+cuda10.0
また, インストール後, 環境変数 CUDA_HOME を設定しておく. 必須ではないが, あると後々便利である.
echo "export CUDA_HOME=/usr/local/cuda >> ~/.bashrc"
nvidia-smi を実行すると, ドライバと CUDA のバージョンが表示されるはずである.
Mxnet
インストール
公式の手順は以下だが, あまり更新されていないようだ. 依存バージョンなども書いてない. GCC 4.8 以降と書かれているが, 実際には 6 以降にも対応していない. 結局, R パッケージのビルド時の互換性も考慮して, 5.5 を入れた. (おそらく私以外の環境でも) 既に他のバージョンのコンパイラが入ってるので, update-alternatives でバージョン管理するようにした.
sudo apt install gcc-5 g++-5
sudo update-alternatives --install /usr/bin/gcc gcc /usr/bin/gcc-5 40 --slave /usr/bin/g++ g++ /usr/bin/g++-5
sudo update-alternatives --config gcc # 対話的に選択/確認
gcc --version, g++ --version などとすれば, バージョンが変わっていることが確認できるはず.
次に, 依存しているライブラリ openBLAS, LAPACK をインストールする. 画像認識に使うのでついでに openCV も入れる. OpenMP も入れているが, これは多分なくても良い. それから git で mxnetのソースを落とす.
sudo apt update
sudo apt install -y build-essential git # 一応書いておく
sudo apt install libopenblas-dev liblapack-dev
sudo apt install libopencv-dev # 画像認識に使わないのなら不要
sudo apt install libomp-dev # あってもなくてもいい?
git clone --recursive https://github.com/apache/incubator-mxnet mxnet
cd mxnet
次に, libmxnet.so をビルドするために config.mk を作成する. 公式では最低限の設定だけを書き込んでいるが, うまくいかなかったので ./make/config.mk をコピーして一部書き換えたものを使った. USE_CUDA や USE_CUDA_PATH はもちろんだが, USE_MKLDNN = 0 なども設定しないとうまくビルドできなかった.
具体的には, これを指定しないと R で読み込む時に libmxnet.so を参照するパスがなぜかカレントディレクトリになってしまい, 読み込みに失敗する*4.
cp make/config.mk ./
patch -u < config.mk.patch
make -j $(nproc) #
パッチファイル config.mk.patch は以下の通り
--- config.mk	2019-11-09 10:22:17.870537000 +0900
+++ config.mk	2019-11-15 00:15:49.582951000 +0900
@@ -70,18 +70,18 @@ USE_TVM_OP = 0
 #---------------------------------------------

 # whether use CUDA during compile
-USE_CUDA = 0
+USE_CUDA = 1

 # add the path to CUDA library to link and compile flag
 # if you have already add them to environment variable, leave it as NONE
 # USE_CUDA_PATH = /usr/local/cuda
-USE_CUDA_PATH = NONE
+USE_CUDA_PATH = ${CUDA_HOME}

 # whether to enable CUDA runtime compilation
 ENABLE_CUDA_RTC = 1

 # whether use CuDNN R3 library
-USE_CUDNN = 0
+USE_CUDNN = 1

 # whether to use NVTX when profiling
 USE_NVTX = 0
@@ -111,7 +111,7 @@ USE_OPENMP = 1
 # whether use MKL-DNN library: 0 = disabled, 1 = enabled
 # if USE_MKLDNN is not defined, MKL-DNN will be enabled by default on x86 Linux.
 # you can disable it explicity with USE_MKLDNN = 0
-USE_MKLDNN =
+USE_MKLDNN = 0

 # whether use NNPACK library
 USE_NNPACK = 0
@@ -123,7 +123,7 @@ UNAME_S := $(shell uname -s)
 ifeq ($(UNAME_S), Darwin)
 USE_BLAS = apple
 else
-USE_BLAS = atlas
+USE_BLAS = openblas
 endif

 # whether use lapack during compilation
ビルドには結構時間がかかる. 最後の -j $(nproc) はビルドで並列処理全てのCPUコアを使うというオプションだが, 最大にしても結構時間がかかると思うので, ビルド中に動画を見るなどして暇つぶししたいなら最大コア数より少なめに設定しておこう. エラーなく終わったら, 次に R パッケージをビルドする
make rpkg
これでパッケージがインストールされる*5はず.
動作確認
R を開いてチュートリアルコードを動かしてみる. 一番簡単な, "Five Minutes Neural Network" を試す.# 一番簡単なやつ # https://mxnet.apache.org/api/r/docs/tutorials/five_minutes_neural_network require(mxnet) mx.ctx.default(new = mx.gpu()) # デフォルトで GPU 使うように # 簡単な演算処理テスト a <- mx.nd.ones(c(2,3)) b <- a * 2 + 1 pacman::p_load(mlbench) data(Sonar, package="mlbench") Sonar[,61] = as.numeric(Sonar[,61]) - 1 train.ind = c(1:50, 100:150) train.x = data.matrix(Sonar[train.ind, 1:60]) train.y = Sonar[train.ind, 61] test.x = data.matrix(Sonar[-train.ind, 1:60]) test.y = Sonar[-train.ind, 61] mx.set.seed(42) model <- mx.mlp(train.x, train.y, hidden_node=10, out_node=2, out_activation="softmax", num.round=20, array.batch.size=15, learning.rate=0.07, momentum=0.9, eval.metric=mx.metric.accuracy )
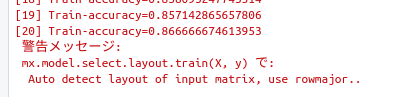
mxnet Auto detect layout of input matrix, use rowmajor..という警告が出るが, これは入力の行列を行=1インスタンスで読み込んだという通知なのでなにか問題が発生したわけではない.
動作を確認したら, 忘れずに update-alternatives で gcc のバージョンを戻しておく.
rstudio/keras
以下が公式ドキュメント. なお, keras は tensorflow をバックエンドにしてるので, rstudio/keras をインストールすると tensorflow も扱えるようになる.
reticulate のインストール
rstudio/keras は実際には背後で python のAPIを走らせている. そのために R 上で python を実行する reticulate パッケージが必要になる. reticulate パッケージは既に日本語で解説しているページもいくつかある.
qiita.com
speakerdeck.com
しかし, python 実行環境は pyenv, virtualenv, conda, などなど多岐にわたるが, 公式ドキュメントも含めてあまり詳しく触れていない (少なくとも conda, virtualenv の環境を読み込む方法しか書かれていない.). インストールは python 環境によってはハマるので, まず reticulate のインストールについて説明しておく. 既にインストールできて問題なく動くというのなら, ここは飛ばしても良い.
私は python の複数バージョンを使い分けるのに pyenv を使っているのだが, 普通に pyenv で環境作成すると共有ライブラリが用意されないので, PYTHON_CONFIGURE_OPTS を設定してインストールし直す必要がある (こういう環境依存の話は公式ドキュメントに書いておいてほしいが, やはり人がいないのか……*6.
インストールしたモジュールを全て再インストールする必要があるが, pip freeze を使うと比較的簡単に再構築できる*7.
pyenv で共有ライブラリ付き環境を, 例えば python 3.7 で作成するには, 以下のようにする*8.
pip freeze > requirements.txt
pyenv uninstall 3.7.0
env PYTHON_CONFIGURE_OPTS="--enable-shared" pyenv install 3.7.0
pip install -r requirements.txt
もちろん, 普通にシステムにインストールした python を使っても良い. その場合は以下のように libpython*-dev を忘れずにインストールする.
sudo apt install python3.X libpython3.X-dev
次に, R を起動して reticulate をインストールする. CRAN に登録されているので install.packages() でインストールできる. reticulate は読み込まれた時点で python インタプリタの実行ファイルパスを探索するが, おそらく優先順位的にシステムのpythonが選ばれる. パスは py_discover_config() で確認できる.
require(reticulate)
py_discover_config()
これを変更したい場合は, 先に RETICULATE_PYTHON 変数にパスを与えておく*9*10. 例えば, pyenv global で設定しているなら which コマンドでパスを得られるから, 以下をRで実行する.
Sys.setenv(RETICULATE_PYTHON=system("which python", intern = T))
これは最初に1度だけやればいい*11ので, .Rprofile 起動時に自動実行されるところに書いておいたほうが良いだろう. 環境変数なので Renviron でもたぶんいける*12.
require(reticulate)
use_python(system("which python", intern = T)) # 私の環境では意味がなかった
py_discover_config() # パスが正しいか確認
簡単な動作確認として, 文字列を python コードとして評価する py_eval() と, モジュールを読み込む import() を試してみる.
py_eval("1 + 1")
import("os")
エラーがでなければとりあえず問題ないだろう.
rstudio/keras のインストール
reticulate が動くことを確認したら, R で rstudio/keras をインストールする. CRAN ではなく github からダウンロードするので, devtools が必要*13.
devtools::install_github("rstudio/keras")
インストールした rstudio/keras は読み込んだだけでは使えない. 既に言ったように背後で python スクリプトを走らせているので, まず python のほうに keras をインストールする必要がある*14. 今回は GPU 版をインストールしたいので, tensorflow="gpu" を指定している.
require(keras)
install_keras(tensorflow="gpu")
動作確認
チュートリアルにある MNIST データの分類問題を実行してみる.mnist <- dataset_mnist() x_train <- mnist$train$x y_train <- mnist$train$y x_test <- mnist$test$x y_test <- mnist$test$y x_train <- array_reshape(x_train, c(nrow(x_train), 784)) x_test <- array_reshape(x_test, c(nrow(x_test), 784)) x_train <- x_train / 255 x_test <- x_test / 255 y_train <- to_categorical(y_train, 10) y_test <- to_categorical(y_test, 10) model <- keras_model_sequential() model %>% layer_dense(units = 256, activation = 'relu', input_shape = c(784)) %>% layer_dropout(rate = 0.4) %>% layer_dense(units = 128, activation = 'relu') %>% layer_dropout(rate = 0.3) %>% layer_dense(units = 10, activation = 'softmax') summary(model) model %>% compile( loss = 'categorical_crossentropy', optimizer = optimizer_rmsprop(), metrics = c('accuracy') ) use_session_with_seed(seed=42,disable_gpu=F) history <- model %>% fit( x_train, y_train, epochs = 30, batch_size = 128, validation_split = 0.2 ) model %>% evaluate(x_test, y_test) model %>% predict_classes(x_test)
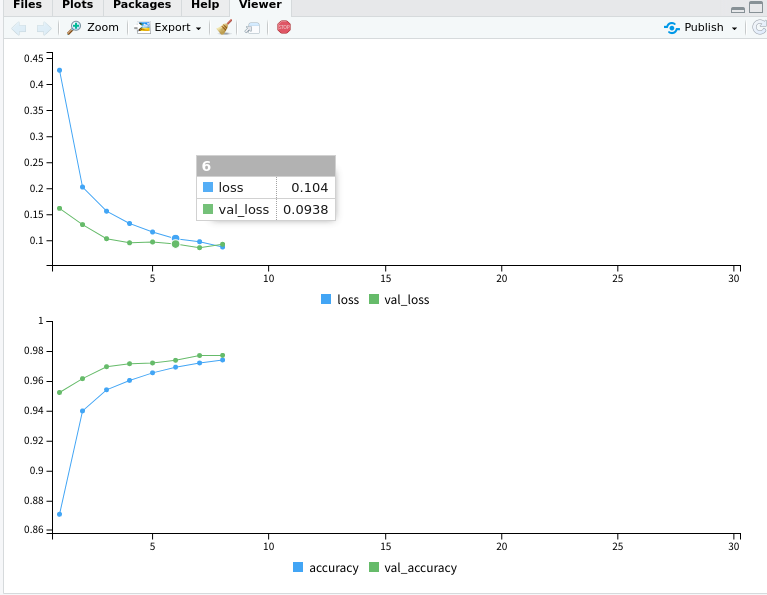
RStudio 上で動かすと, デフォルトで学習曲線がリアルタイムで描画される. 使い勝手の良い描画ライブラリのない Python に対しての Rの強みだろう (どちらかというとリアルタイム描画がありがたいというよりも, 煩雑な matplotlib のコードを書かずに済むというのが重要).
なお, Python で上記のコードに近いものを書こうとすると, こうなる. 学習曲線の描画はできない*15.
import keras
from keras import datasets
from keras import layers
from keras.utils import to_categorical
from keras.optimizers import  RMSprop

# -- MNIST の読み込み --
# mnist <- dataset_mnist()
# x_train <- mnist$train$x
# y_train <- mnist$train$y
# x_test <- mnist$test$x
# y_test <- mnist$test$y
# x_train <- array_reshape(x_train, c(nrow(x_train), 784))
# x_test <- array_reshape(x_test, c(nrow(x_test), 784))
(x_train, y_train), (x_test, y_test) = datasets.mnist.load_data()
x_train = x_train.reshape(x_train.shape[0], 784)
x_test = x_test.reshape(x_test.shape[0], 784)
x_train = x_train.astype('float32')
x_test = x_test.astype('float32')

# -- 前処理 --
# x_train <- x_train / 255
# x_test <- x_test / 255
# y_train <- to_categorical(y_train, 10)
# y_test <- to_categorical(y_test, 10)
x_train /= 255
x_test /= 255
y_train = to_categorical(y_train, 10)
y_test = to_categorical(y_test, 10)


# -- MLP の定義 --
# model <- keras_model_sequential()
# model %>%
#   layer_dense(units = 256, activation = 'relu', input_shape = c(784)) %>%
#   layer_dropout(rate = 0.4) %>%
#   layer_dense(units = 128, activation = 'relu') %>%
#   layer_dropout(rate = 0.3) %>%
#   layer_dense(units = 10, activation = 'softmax')
model = keras.models.Sequential()
model.add(layers.Dense(256, activation='relu', input_shape=(784, )))
model.add(layers.Dropout(rate=0.4))
model.add(layers.Dense(256, activation='relu'))
model.add(layers.Dropout(rate=0.3))
model.add(layers.Dense(10, activation='softmax'))

# summary(model)
model.summary()

# model %>% compile(
#   loss = 'categorical_crossentropy',
#   optimizer = optimizer_rmsprop(),
#   metrics = c('accuracy')
# )
model.compile(loss='categorical_crossentropy',
              optimizer=RMSprop(),
              metrics=['accuracy'])

# -- 学習 --
# history <- model %>% fit(
#   x_train, y_train,
#   epochs = 30, batch_size = 128,
#   validation_split = 0.2
# )
history = model.fit(x_train, y_train,
                    epochs=30,
                    batch_size=128,
                    verbose=1,
                    validation_split=0.2
                    )

# -- 出力 --
# model %>% evaluate(x_test, y_test)
# model %>% predict_classes(x_test)
model.evaluate(x_test, y_test, verbose=0)
model.predict_classes(x_test)
*1:python なら pip コマンドだけで GPU 対応版をインストールできるため
*2:試してないが tensorflow も同様にできると思われる.
*3:https://www.tensorflow.org/install/gpu, https://qiita.com/yukoba/items/4733e8602fa4acabcc35
*4:https://github.com/apache/incubator-mxnet/issues/13859#issuecomment-453807195
*5:少し前はさらに R CMD ... をする必要があったが, 今は make に組み込まれている
*6:この辺に引っかかって進めなかったので R-wakalang で質問した. 回答してくれた igjit 氏に感謝. https://github.com/tokyor/r-wakalang
*7:私は試してないが, pyenv-virtualenv で作った仮想環境はどうか?
*8:Mac だと --enable-frmaework になるらしい? 未確認.
*9:https://rstudio.github.io/reticulate/articles/versions.html
*10:公式のトップや日本語で紹介しているとこでは use_python() で指定できると書いているが, 私の環境ではできなかった. みんな *conda などを使っていると想定しているのだろうか?
*11:2回やるとクラッシュする
*12:この辺の話は https://heavywatal.github.io/rstats/config.html が参考になる.
*13:RStudio 使ってるならこの話は気にしなくても良い
*14:virtualenv または conda の仮想環境を新たに作成し rstudio/keras 専用に使うので, 既にインストールしているかどうかは関係ない.
*15:事後的にやる方法はここで紹介されているが, それにしても面倒くさい. https://keras.io/ja/visualization/ ただし, https://github.com/stared/livelossplot を使えば比較的簡単にできる.